
The first start in Business Central AL is very difficult for many. It doesn't matter if you come from Navision or if you are new: The hurdles are significantly higher than in native times.
This is not necessarily because Business Central is so complicated to program. It is rather because the earlier versions of Navision were so incredibly easy to program! If you have ever really developed in Navision 3.5x (DOS) or Navision up to version 2009R2, everything that comes after that is unnecessary and terribly complicated. And: it is. As a "nice" side effect remains to note that now every even small development / adjustment takes at least twice the time, compared to the versions up to 2009R2. If a report layout just above "list" is added, one should rather reckon with the factor 3-5 from his experience. What was done in seconds in the native navisions (insert a column or field, quickly click together an evaluation), now takes - with the development environment already set up! - rather 10 minutes. As soon as it comes to documents (header/rows, page change), it quickly becomes hours and days.
Setting up the development environment alone now easily takes an hour during the first attempts at use.
Additional search terms: Getting started with Navision / Business Central 2020, Start Programming with Navision / Business Central AL 2020, Introduction to VisualStudio Code for NAVISION / BUSINESS CENTRAL 2020, Setting up Visuals Studio Code for Navision / Business Central Extensions.
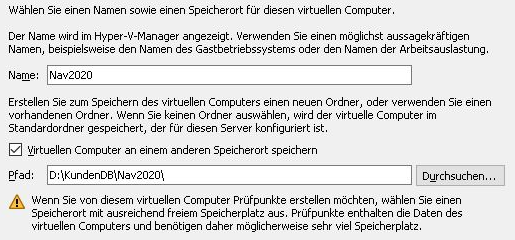
Virtual machine setup
If only one Navision is maintained, e.g. the company's own productive one, this step is not necessary.
The times when 5 different Navisions ran quite smoothly on one computer are over. The whole following setup must fit exactly (!) to the installed Navision or Business Central, best even to the patch level (CU = Cumulative Update). My recommendation, especially for programmers & developers: One VM per installation, e.g. one VM for a demo version, one VM for customer version 2019 Second Wave Cu2 etc.
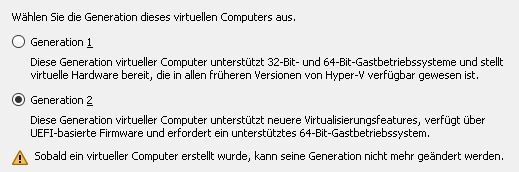
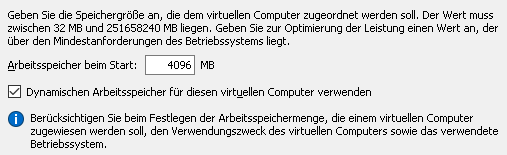
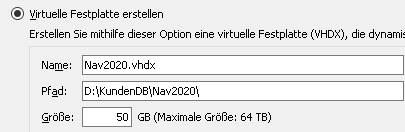
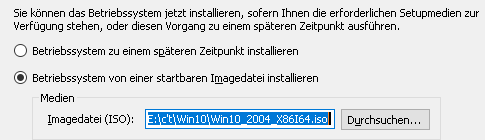
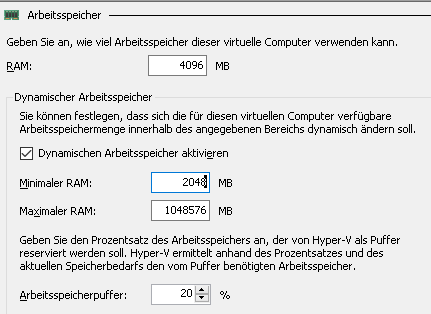
Set up a HyperV with 4 cores and 4096 MB Ram, at least 50 GB hard disk.
I do not need to document the setup of Windows 10 or Windows Server here, it is not critical. Simply "once as always". I recommend an offline account, disable all features offered during setup incl. Cortana, directly remove the search bar, mail, Microsoft Store from the taskbar.
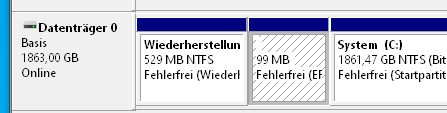
Immediately after the first setup, please check if your Windows has packed the recovery partition BEHIND the data partition:

Deleting the recovery partition
In order to continue to be able to enlarge the data partition, the division of Windows with the recovery partition behind the data partition is extremely annoying. For example, you cannot simply enlarge the drive to restore a database backup and then simply shrink it again. On a Vm, however, you can very well do without the recovery partition.
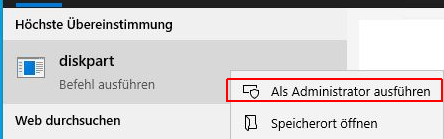
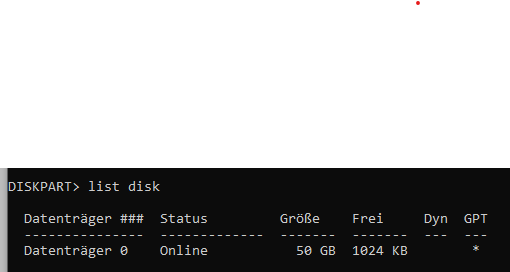
3. switch with select disk 0 to the first disk (in the VM there is only one!)
4. view the partitions with list volume .
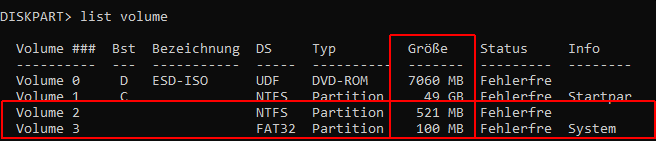
Based on the sizes, you can quickly find the volumes (partitions) to be deleted, here Volume 2 and Volume 3.
5. switch to the first volume (partition) to be deleted with select volume 2 and delete it with delete partition override. Repeat this step if necessary.
Now you can enlarge and shrink the data partition as usual and thus also adjust the associated virtual hard disk to the real needs.
If you use Oracle Vm Virtual Box, you cannot increase the virtual hard disk graphically. Here the hard disk is generally managed on the command line. Enlarge it then e.g. with c:\“Program files\oracle\VBoxManage“ modifyhd „volume.vdi“ -resize 60000.
Windows no longer boots with virtualization
Since Windows 2004 / 2020H2 there seems to be an incompatibility with Intel Virtualization. At least, I had the unpleasant experience that after a completely normal computer restart -without knowing update/change- my Lenovo Thinkpad P73 only greeted me with Bluescreens of Death (BSOD). Most of the time the error message IRQL NOT LESS OR EQUAL came up, more rarely Kernel Security Check Failure. Unplugging the USB-C docking station, removing RAM, removing other system disks, activating a restore point, even reinstalling a backup created via a custom WIMage script did not bring any change. In some cases, Windows even hung directly at boot time: The rotating circle of dots under the Windows logo suddenly stopped, and after a short time the computer restarted completely.
The only thing that helped on my machine was to disable Intel Virtualization support!
In the (UEFI) Bios: Security/Virtualization, set the two options "Intel Virtualization Technology" and "Intel VT-d Feature" to Disabled.
"DMA Memory Protection" should be disabled on the Lenovo machine anyway when using a USB-C docking station, otherwise you will have even more problems. Not bad for a professional workstation from the brand manufacturer Lenovo, huh? But then, of course, HyperV won't run anymore. My only solution: Uninstall HyperV & Sandbox under Windows, and continue working with Oracle VM Virtual Box.
With vboxmanage clonehd "Source.VHDX" "Destination.VDI" -format VHD a VDI hard disk can be pulled from a VHDX file. The VHDX can be deleted afterwards. via vboxmanage also a complete VM can be initialized! Thus OracleVM Virtualbox vboxmanage is altogether more efficient than HyperV... but just not as elegantly integrated as HyperV.
Setup Navision & Business Central as demo / development environment
If a productive system is already available, this step is not necessary. Carry out the setup only on a computer that you do not want to use productively for a 2nd Navision, e.g. Test & Productive. Here I recommend the use of two VM's.
With this guide you will install a 2020 SecondWave out of the box. The earlier versions with C/AL Side by Side can can be found very compact here.
With this tutorial here you will also create a demo version of Business Central (Navision). But the goal is to set up a complete environment for Business Central / Navision programmers/developers/consultants.
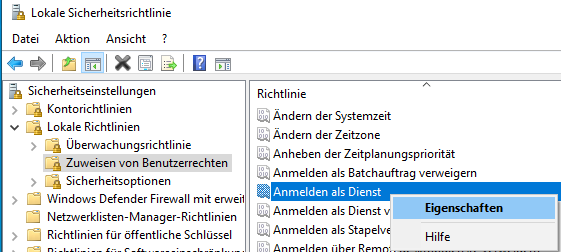
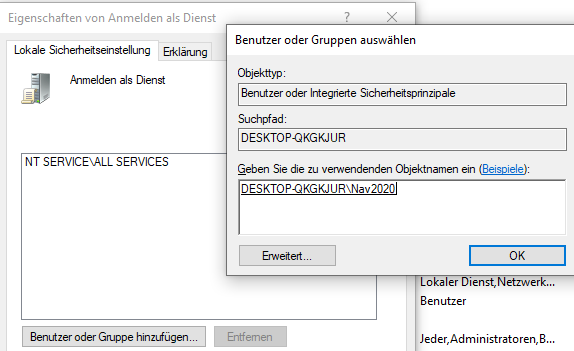
Assign the right to log on as a service to your local admin account:
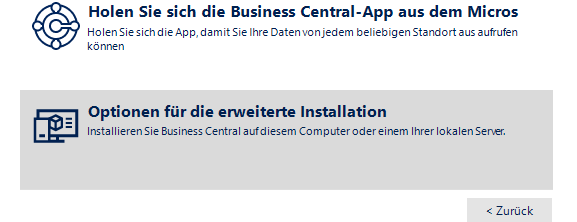
2. Run the setup from the Business Central CD, accept the license terms, and select Advanced Installation Options:
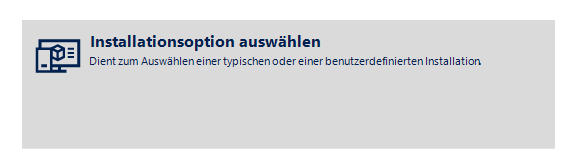
3. Select Custom. Attention: do not enter "Load configuration".

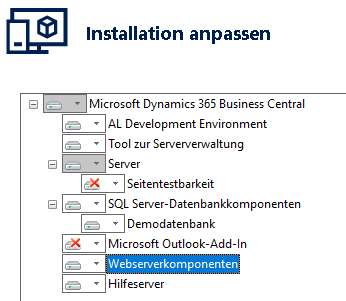
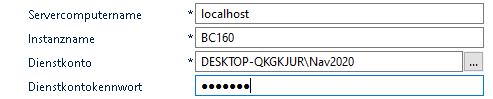
4. make the following settings:
Service failed to start. Verify that you have sufficient privileges to start system services
Yes... "normally" a setup works right out of the box. And if you have a fresh, basic Windows system, then it will work as above. Domain memberships, execution restrictions, virus scanners... There are so many things that can make your life miserable 🙂
If you get the error message "Service Microsoft Dynamics 365 Business Central Server (BusinessCentral 140) (MicrosoftDynamicsNavServer$BusinessCentral140) failed to start. Verify that you have sufficient privileges to start system services (where 140 will always be the installed version number), things get a little hairy.
Possibly ports that you have predefined for Navision (for example, by leaving the default ports, which is quite good) are already occupied.
Try the following:
Start a command prompt with admin rights, enter
netsh http show urlacl
there. You will then get a longer list with such entries:
Reserved URL : https://*:5358/
User: PREDEFINED/User
Listening: Yes
Delegate: No
User: NT-AUTHORITY\Local Service
Listening: Yes
Delegate: No
SDDL: D:(A;;GX;;;BU)(A;;GX;;;LS)
If you find an entry with the number 7047,7048,7049 or the values you assigned yourself during setup, delete this reservation, in the above example
netsh http delete urlacl url= https://*:5358/
Then please check if the Navision Service Tier was installed. if yes, delete it with the configuration console. Then set up a new NST.
Another method to get Navision / Business Central running despite the error message "Service Microsoft Dynamics 365 Business Central Server (BusinessCentral 150) (MicrosoftDynamicsNavServer$BusinessCentral150) failed to start. Verify that you have sufficient privileges to start system services to run is to trick the installer. If you press "Cancel" on this error message during setup (and you won't get anywhere else), Navision or Business Central will uninstall the service again.
Try the following:
Do not press Retry (does nothing) or cancel (uninstalls everything).
Go to the system services, you should see the Navision service here:

In this case, you have already done 99% of the work... Only the setup does not want to recognize this achievement.
In the service setting, change the login name to the service mentioned at the beginning and try to start the service.
At this point, you can also use the already installed Microsoft Dynamics 365 Business Central Server Console to change the setup, which was not possible before (due to lack of service folder).
The ServiceStart will probably still not work, but you now have the tools you need for now.
Next comes the most unusual: shoot the setup without giving it the possibility of a rollback!
This is usually not possible with the task manager (but you can try it). Usually the setup recognizes the system command Close, and does its rollback again: Everything is gone.
Start the task manager instead, we need the PID from the setup:
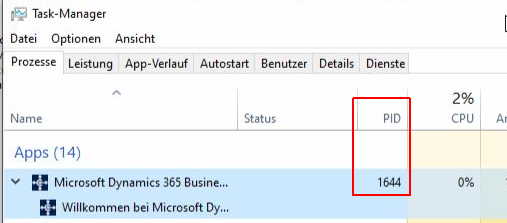
Now start a command line with admin rights, and enter:
taskkill /PID 1644 /T /F (you have just found the 1644 in the task manager, you can also find it with tasklist on the command line. You may have caught a child process from the setup, then taskkill tells you: Error: The process with PID XXXX (child process of YYYY) could not be terminated.
Then repeat the taskkill again with YYYY. This may be necessary recursively.
If you don't get further this way, pull the plug or switch off the VM hard. Under no circumstances press "Cancel"!
After the restart you can watch the Navision service tier via the event viewer and see why it is burping. It's almost certain that it still won't run after this... but at least you can now easily monitor and manage it.
Do not be irritated by a continuous status "being started". Press F5 in the service display, the startup attempt always takes only a few (typically <30) seconds.
After the computer is completely fresh booted, just restart the service once, and then check the event viewer.
Surely you will then find the actual valid indication of what to do there.
The connection to SQL server could not be established : Now go to the working Management Console and check the server settings. Of course, also check whether the SQL server with the (demo) database is running at all.
Note: You can also use ServiceControll (SC) to install a Navision server service:
sc \\Computername create MicrosoftDynamicsNAVServer$NAVision binpath= „Program directory\140\Service\Microsoft.Dynamics.Nav.Server.exe $NAVision“ DisplayName= „Microsoft Dynamics NAV Server 140“ start= auto type= own depend= NetTcpPortSharing But I recommend configuring it via Setup.exe. Once you are at that point, when you have to use shi..., the installation is so screwed up that you probably won't get it to work anyway. It may also help to simply take a deep breath, reboot the computer completely from scratch, start over.
Login failed for user ‚NavServer‘. Reason: An attempt to login using SQL authentication failed. Server is configured for Windows authentication only
This is often the case when switching the Navision / Business Central Server service from Windows Authentication (e.g. Networkservices or Network Service) to SQL Server Authentication, or vice versa.
Reason: The Navision setup installs the SQL Express with Windows only. So you can create as many SQL_Users in the SQL Server as you want: The SQL will still not allow a connection with Navision.
With the MS SQL SMS click on the server right mouse button, properties, security, enable mixed mode.
Do not search in the event viewer! This information can only be found in the SQL_Log.
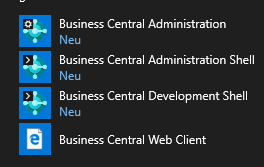
Extra tip: Put at least these programs in your taskbar right away:

If you already have an SQL_Server in use that is to host the Navision database, you can also simply specify this SQL server in this step.
After a few minutes the setup will report back with success. You now have Business Central, a SQL server, the 3-tier architecture and a link installed on your computer.
Depending on the Windows version you are using, you still need a browser that can display Navision or Business Central properly. Here you have the choice between Google Chrome (worked very early very well with Navision, my recommendation), Edge (works only with Business Central, after Microsoft gave up their own engine and took that of Chromium), Firefox (works "quite well", but is in this context 2nd choice). Internet Explorer is only available if you prefer dripping Tabasco and lime juice into your eyes. But it is quite suitable for installing Chrome :-).
Set up Business Central server tier
To be able to automatically load the symbols and the base code (Base Application) with VSC (Visual Studio Code), the Business Central and Navision DiensteServer must be released for the development environment. Start the Business Central Administration, switch to the desired instance (in this demo here it is the BC160), Development

Enable Debugging: Activate
Enable Developer Service Endpoint: Activate
The rest remains as preset.
Setup VS-Code
The times of an integrated development environment are over, also "Low-Code" or "Easy-Programming". If you used to be able to create a complete data structure (but without deletion forwarding, unfortunately Navision/Microsoft never managed to do that) incl. document report with header/line structure completely without a line of program code, today you cannot even change an editable yes/no without something like program code.
I strongly recommend not using "Docker" unless you are already experienced with this topic ("Docker" on Windows with Business Central or Navision). In that case, you certainly don't need my guidance either. Rather use the concept of virtual machines as described above, especially for the start.
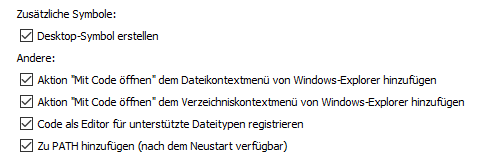
- Download, install & launch Visual Studio Code from here (You can also just search for Visual Studio Code in your browser).
Recommendation: Enable all options.
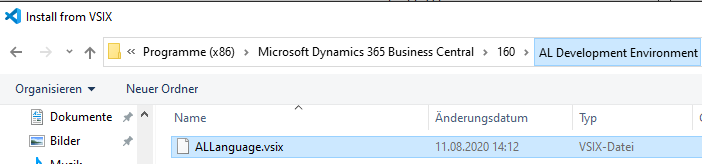
2. install the AL environment "AL Language" (this takes a few seconds)
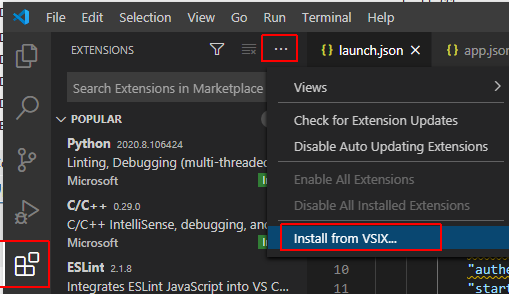
3. activate the current Navision and Business Central environment
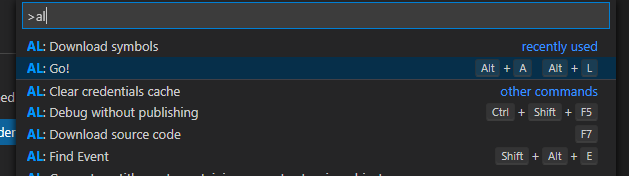
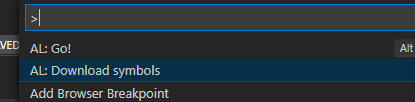
With Shift+Ctrl+P you call the process (or whatever the P may mean) command and start your first Navision object with al:go. Before that you cannot load the AL environment!
Tip: Run the snippet AL:Go once, and note down (yes, so with pencil and so) the queries that come, together with the answers. If necessary, fill in the answers. Then discard this first project, enter all missing answers in your note, and start again.
You need: project name (get used to a central directory quickly!), TargetPlatform (your server), possibly user name, user password, server name
Adjust launch.json und app.json
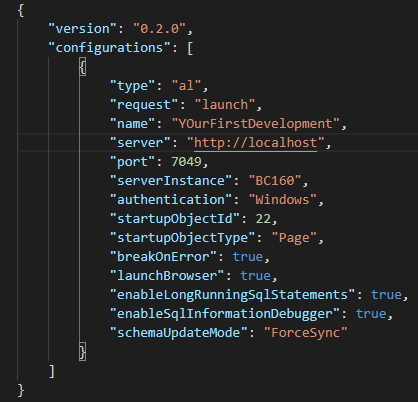
Edit the resulting launch.json right away.
Add "schemaUpdateMode„:“ForceSync"
(Tip: At this point, the AutoCompleteWizzard must already appear after entering she )
Add "port":7049 (see Development Port above)
Change the Authentication to Windows
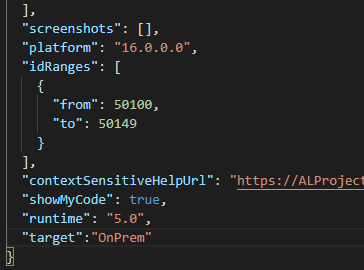
Edit app.json, add „target„: „onPrem"
Note: Of course, for a regular development you also have to adjust many of the other parameters, but that's another, very broad topic. This is only about creating a first sensation of happiness.
Note 2: Why OnPrem? This is the only way you can continue to integrate .Net (DotNet) objects into Business Central or Navision - and in such a professional way that they can really enjoy it in the new Navision. The other way round it becomes: In all other targets, especially in the cloud, there is simply no .Net (DotNet) anymore. The end. Out. Period. Gone. No "But" and no "I do need...!".
OK Ok ok... About Blazor it works again, but that is also not the topic for an introduction here.
Load symbols
Now you can / must load the symbols (all internal references, commands, functions, table names, fields...): CTRL+Shift+P, AL:Download Symbols
After a few seconds, the message appears saying that the icons have been downloaded correctly. The message disappears, the joy remains: The HelloWorld application registered by the wizard suddenly compiles without errors:
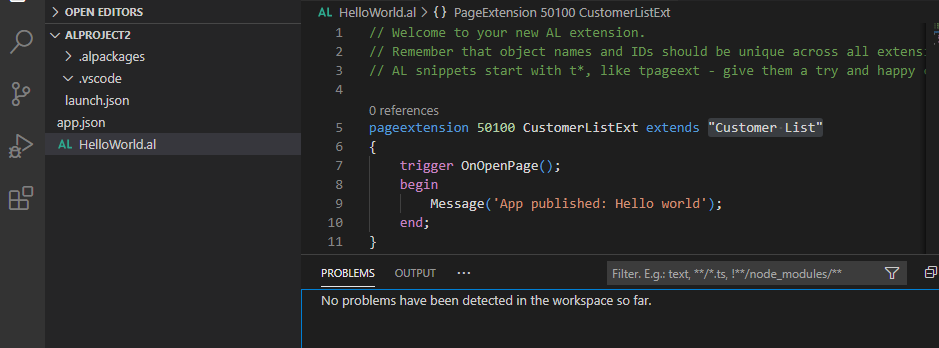
Welcome to your new Navision / Business Central development environment (programming environment).
License management Fin.flf
Even Microsoft recommends to use the Navision development client to view and update the license in 2020. This is of course just a joke... I hope. Because this is already not included at all since Navision & Business Central 2019 second Wave. You have to use the powershell for that.
Start the Business Central and Navision Administration Powershell as admin:

View the current license information
Type "export-navs" and press the TAB key, then spacebar and instance name + enter. In our example that is
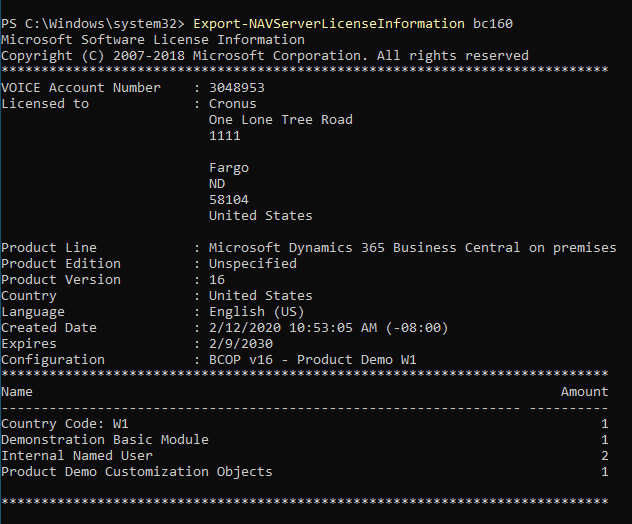
Export-NAVServerLicenseInformation bc160
Navision or Business Central shows you the license information stored in this license:
Import a new license file
In the same shell please type Import-NAVS and press TAB. If the correct command is not displayed immediately, use TAB in the Powershell (as in the earlier batch programming for the file names) to cycle through the commands:
Import-NAVServerLicense BC160 -LicenseData ([Byte[]]$(Get-Content -Path „c:\temp\fin.flf“ -Encoding Byte)) -Database NavDatabase
Please note: BC160 is its instance, "c:\temp\fin.flf" is the path and filename of your license file. Attention. Business Central and Navision or the Powershell already checks if the license is suitable for your system. If not, a corresponding warning will be issued. But But the license file will be imported anyway! So before you import a new license file, always check that you have the previous license file as a file. This way you can switch back to the previous state in case of an error by simply importing the working FIN.FLF again.

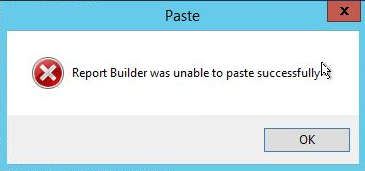
Report Builder was unable to paste successfully
This doesn't really belong in Introduction to AL, but rather in Introduction to RDLC or Report Builder... but that would be too much to cover here. So here's just a small excerpt on this really annoying issue with Microsoft SQL Report Builder when you want to copy a field. Basically, this is a bug, not a feature, but there is a quick workaround.
Scenario: You want to copy a field in Report Builder (whether it's SQL Report Builder, which comes with every version of Navision/Business Central, or the actual Visual Studio (not Visual Studio Code!)) and get this error message:
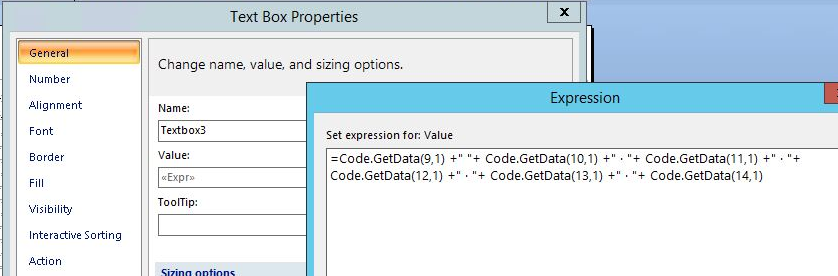
The cause is clearly a program error, but from our point of view, the problem is this: The “value” of a text box can be found via the text box, right mouse button, Text Box Properties, Value, the Formula button, or, more briefly, text box, right mouse button, Expression. Both methods lead to the expression, which is recognized or designated by Report Builder as “Custom Code”:
All we have to do here is add a comment to the expression of the text box BEFORE copying. Really! Welcome to Microsoft.
The expression then looks like this, for example:

Now this text box can be copied in Report Builder without the error message “Report Builder was unable to paste successfully” until the cows come home.
Im Internet kursiert auch der Tipp, statt des Abostroph (‚) einen Doppel-Slash (//Comment oder was auch immer) zu benutzen. Das funktioniert auch, muss aber nach dem Einfügen wieder entfernt werden, sonst gibt es in Navision die unschöne Fehlermeldung
Microsoft Dynamics NAV Development Environment
Error checking RDL content:
The value expression for the textrun object ‘FooderMiddle4.Paragraphs[0].TextRuns[0]’ contains an error: [BC30201] Expression expected.
If you use a ‘Comment instead of //Comment, this text can simply remain in place. And given the rather stupid way in which Microsoft transfers line elements with SetData and GetData for the header and footer, you might as well use this comment to enter something useful (e.g., 'invoice number’).