
The Consolidation in accounting refers to the process of combining the financial data of several affiliated companies or subsidiaries into a single overall balance sheet and income statement (P&L). The aim is to obtain a clear picture of a group's financial position and to ensure transparent reporting.
This is done in Navision as well as in BC365 (Business Central 365) by following these steps:
Preparing for consolidation in Navision / BC365 (Business Central 365)
- A new client needs to be set up.
In Navision, go to File/Client/New; in BC365, press Alt+Q, Clients. - A chart of accounts must be set up in this new client. There are essentially two strategies here:
A) Simply adopt the chart of accounts from the source clients. If the same or very similar charts of accounts are used in all source clients, this is the most common and simplest solution.
B) A (very) compact chart of accounts is set up in the target client, e.g., only the summary accounts of the source clients. But as real accounts, not as summary accounts! In this way, the consolidation client is practically already a condensed raw balance sheet. - In the source clients (the clients that are to be consolidated into the newly created client), the fields Consolidation debit account (Consol. debit account) and Consolidation credit account (Consol. credit account) must be filled in the G/L accounts (G/L account card).
Here, you can redirect debit postings to accounts other than credit postings, and you can also specify completely different target accounts in the consolidation client.
In variant 2A, you will usually simply enter the respective G/L account number in both fields. In variant 2B, it may be a good idea to enter the respective summary account assigned to this G/L account in these two fields.
Both solutions can be greatly simplified with a small utility program. Please contact me if you need assistance with this .
The Consolidation exchange rate field is usually left set to Average rate (manual) .
Exporting a consolidation file

Attention! If the source and target client(s) are located in a shared Navision/Business Central 365 database, you can skip this file export. Proceed directly to the next step.
Select Consolidation Export. In the Classic Client, go to Financial Management/Financial Accounting/Periodic Activities/Consolidation Export.
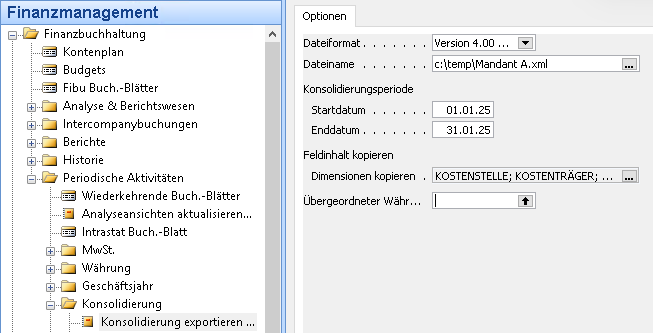
Settings:
File format: XML (the TXT format is only for the really old 3.70 and earlier Navision versions).
File name: Select a file name and storage location where you can find the exported file later.
Consolidation periodFrom when to when do you want to spend? Navision does not log this expenditure! You should therefore only export periods that have already been completely closed! If you make subsequent entries, these movements will no longer appear in the consolidation client. For this reason, a completely closed fiscal year is often exported first. But of course, you can also export monthly, weekly, or daily. We may then need to discuss an automated process and a way to consolidate subsequent entries as well.
Copy dimensions: Using the Assist edit (the three dots on the right side of the field), you can select posting dimensions, which will then also be included in the export file for each transaction.
Except for the file name, please perform the export in all source clients using the same settings.
Attention! In Navision version 4.0 and higher, as well as in all RTC versions up to Business Central 365, you can save yourself this export! Here, you can import the data from the source clients directly into the target client from the same database! However, this is limited to clients in the same database. See the next point.
Import/execute consolidation in target client

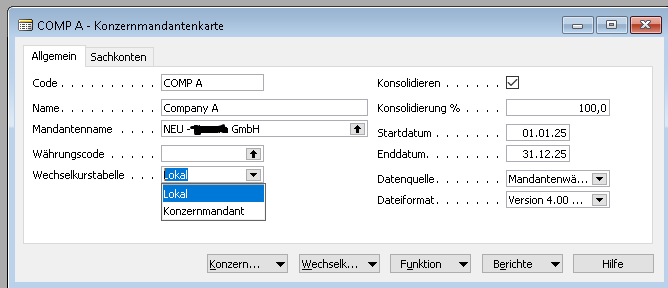
Open the target client created at the beginning. In Business Central 365, use Alt+Q to search for “Group Clients”; in native Navision, go to Financial Management/Financial Accounting/Periodic Activities/Group Clients.
Here you create a group client card for each client that you want to consolidate IN this consolidation client. If you want to consolidate data from two other clients into this currently open consolidation client, please create two group client cards.
Fields:
Code: An abbreviation for this client, which is to be consolidated into the currently open client.
Name: A catchy name for this source client
Client name: Here you can select source clients if they are managed in the same database..
Currency Code: If the source client for this consolidation is managed in a different client currency code than the currently active target client, you can specify the foreign currency in which the source client is managed here.
You can specify Navision conversion rates using the exchange rate table. Either from the currently open consolidation client (“Local”) or from the source client (“Group client”).
Consolidate: Here you specify whether the client associated with this group client card should actually be consolidated. This allows you to store settings here that you may want to use in the future.
Consolidation %: You may want to transfer the movements from the source client to the target client at a higher (% > 100) or lower (% < 100) rate, e.g., to reflect an internal handling cost surcharge. Usually, you will enter 100% here, i.e., the original amounts from the source clients are transferred 1:1 to the consolidation client.
Start & End Date: The period you want to consolidate.
Data source: You can select the amount field here; “client currency code” should be the correct one. However, you can also use the report currency.
File format: Only relevant if you are working with file export/file import (see previous paragraph).
Fields on the “G/L Accounts” page: Here you can specify the corresponding consolidation G/L accounts for the currently open target client if you are working with currency translations. In this case, you will certainly know what to enter here; currency consolidation is beyond the scope of this guide (and I have never encountered it in 30 years of professional experience).
Consolidate – Check database function
You can check the source data for completeness using Check Function/Database and Check Function/File. Do not expect too much; these functions simply check whether all source G/L accounts in the source client have a consolidation debit account and a consolidation credit account (see first paragraph).
Consolidate – Import database function
Here, the previously prepared file is imported and posted directly (or imported from the source file accordingly).
If you have already read/imported (consolidated) this period before, all postings in this period will be reversed (eliminated) and the data provided by the source client will be imported (consolidated). These postings will not be deleted! Repeated consolidation of a period will increase the number of postings (“transactions”) accordingly.
You can view any eliminations that may have been made under “Reports/Eliminations.”